Stairs (November 3 2005)
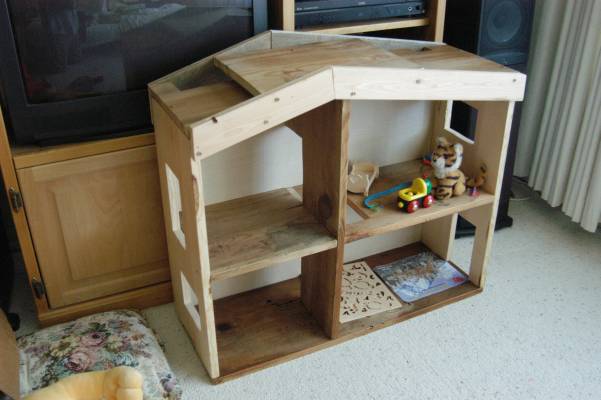
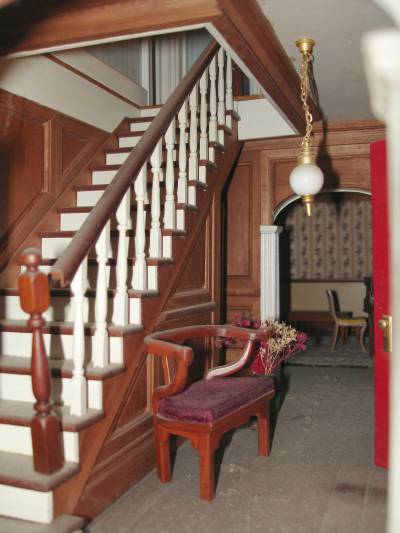
I did the stairs today. There were many possible stair designs,
for example a dowelled railing around the stairwell on the second
floor, solid plywood going from the stairs to a railing going up, or a
staircase that you couldn't see through. I didn't have anything
protrude into the second floor so that the whole second floor can be
used as a bookshelf. That's why I didn't do a plywood railing leading
up too. I made the stairs see-through so that the dollhouse is
easier to play with; you can see the dolls going through the door
behind the stairs.
I could have had the stairs end immediately below
the stairwell, rather than coming out to the edge of the dollhouse.
That would have been steeper. I still probably would have done that,
except my daughter herself pointed out I could extend the stairs to
the edge of the dollhouse to make them not so steep. So with her
blessing I did it that way.
I tried sawing those funny angles at the ends of the long bars, but
the saw and I disagreed at what angle to cut, and the saw won. After
that I did those funny angles just by sanding the ends on very coarse
sandpaper. That worked pretty well.
I attached the stairs by nails at two points on each side. Just
pounding in the nails split the plywood, so I drilled holes. But my
smallest drill
was bigger than the nails, so they just slide in and out. After
assembling the thing I dabbed each nail with Elmer's glue. Hopefully
that will hold it. I don't expect it to have to withstand much stress.
I clamped the long bars together and drilled each hole through both
bars , placing steps 1" apart. I drilled all the holes for each step
before assembling everything. Unfortunately I didn't drill straight
down. That was fine for the first three nails for each step, but I had
to redrill the second hole on one side for most of the steps.
I thought I measured carefully, but the stairs were still a quarter
inch too wide. As my daughter pointed out, it was easier to make the
hole bigger than make the stairs narrower, so I made the hole bigger.
The staircase turned out a little lopsided, leaning to the left.
The center divide isn't straight either it leans to the right. I fixed
this by flipping the stairs upside down from how I originally wanted
to put them in, so now both the stairs and the divide lean the same
way. I should have forseen that that might happen, but I didn't.
The stairs aren't as even the way they are now as they would be if the
staircase weren't upside down. There's a gap between the top stair
and the second floor; I could have avoided that too.
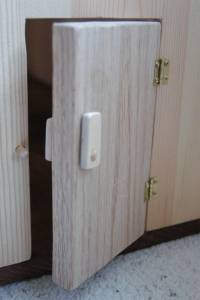
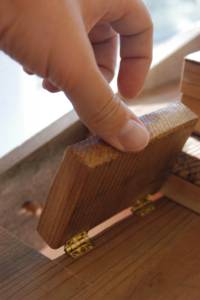
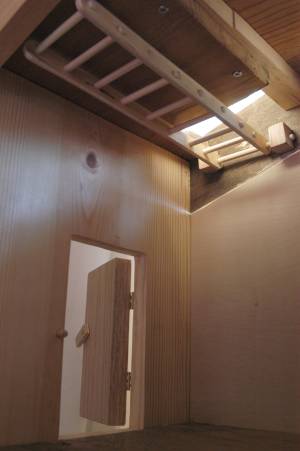
I had to use my funny sidearm screwdriver to attach the stairs by
two screws at the top and one screw at the bottom. I was going to
hammer & nails, but I couldn't fit in the hammer. Note the screw at
the bottom isn't all the way in. That's because the sharp end pokes
through the wall if I screw it all the way in. I tried hacksawing off
the end, but that dulled my hacksaw. I tried filing off the end, but
the screwtip dulled my file. Woah, mega ultra screw there. So it's
not screwed in all the way. Maybe I can dig up a shorter screw.
|  My Grandfather's Dollhouses
 Design
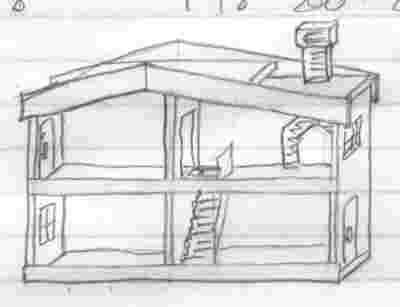
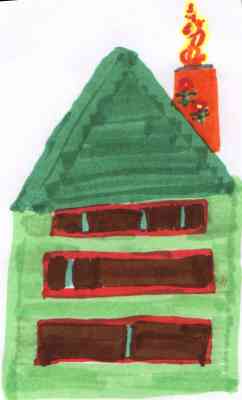 I asked my daughter what she wanted in a dollhouse. She wanted it
green, with a purple roof. And flowers painted on the chimney. And
colored tissue paper for smoke and flames coming out of the chimney.
So far, that's compatible with what I plan to build. I showed her
what I had in mind and she said that's OK. Her picture is to the
left.
I asked my daughter what she wanted in a dollhouse. She wanted it
green, with a purple roof. And flowers painted on the chimney. And
colored tissue paper for smoke and flames coming out of the chimney.
So far, that's compatible with what I plan to build. I showed her
what I had in mind and she said that's OK. Her picture is to the
left.
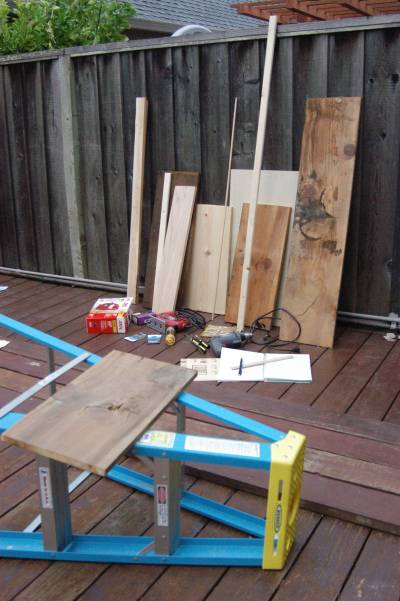
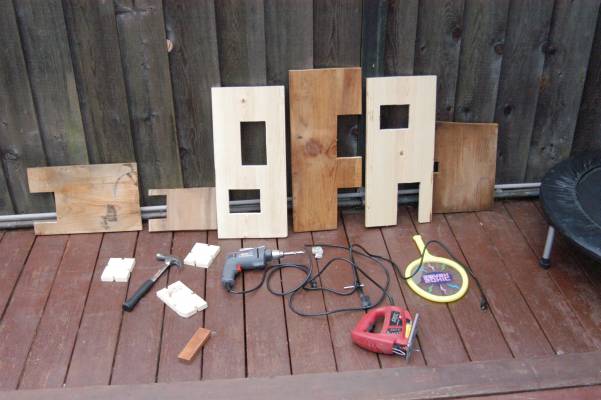 I had an extra-big drill from some previous project, which
I used to drill holes in the middle of the windows. I put the jigsaw
in those holes then tried to do a curved cut to the boarders. It
turned out that the radius of the curve I could make was bigger than
the windows, so I resorted to drilling a hole by each side of each
window then cutting from there. The saw got the job done, but it
bogged down some in the knots. I think the sap was melting and
greasing the blade.
I had an extra-big drill from some previous project, which
I used to drill holes in the middle of the windows. I put the jigsaw
in those holes then tried to do a curved cut to the boarders. It
turned out that the radius of the curve I could make was bigger than
the windows, so I resorted to drilling a hole by each side of each
window then cutting from there. The saw got the job done, but it
bogged down some in the knots. I think the sap was melting and
greasing the blade.
 Once the boards were cut, I discovered my screws
were too short. The boards are 3/4" thick (that seems to be
standard). The screws were 1 1/4" long. However, those first screws
did fine for attaching the plywood back, and they were good for
holding the boards in place while I drilled and screwed in the real
screws. The real screws I got were 2" zinc-plated ones. Their
phillipshead socket was unfortunately tapered, so if the screw's
having a hard time going in, it pushes the screwdriver out of the
hole. Several screws got stripped that way; I had to unscrew them and
replace them.
Once the boards were cut, I discovered my screws
were too short. The boards are 3/4" thick (that seems to be
standard). The screws were 1 1/4" long. However, those first screws
did fine for attaching the plywood back, and they were good for
holding the boards in place while I drilled and screwed in the real
screws. The real screws I got were 2" zinc-plated ones. Their
phillipshead socket was unfortunately tapered, so if the screw's
having a hard time going in, it pushes the screwdriver out of the
hole. Several screws got stripped that way; I had to unscrew them and
replace them.
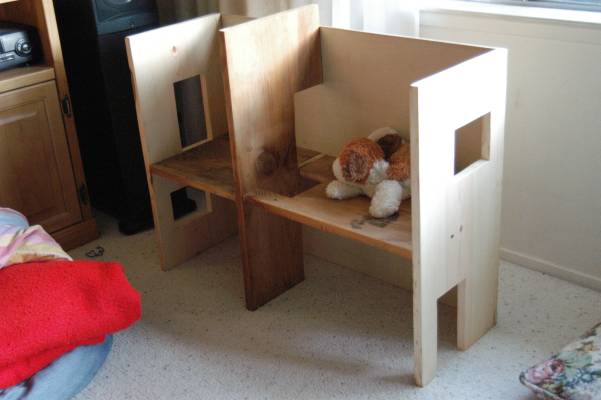 Once I had the vertical boards and second shelf
together, I had a floppy contraption that I could stand up or lay on
its side. I found I'd cut the plywood back 1/2" too short (note to
self, don't cut the back until you can measure it against the final
product). I screwed on the back (countersunk flat-head screws again)
which made the structure rigid. That was it for one day.
Once I had the vertical boards and second shelf
together, I had a floppy contraption that I could stand up or lay on
its side. I found I'd cut the plywood back 1/2" too short (note to
self, don't cut the back until you can measure it against the final
product). I screwed on the back (countersunk flat-head screws again)
which made the structure rigid. That was it for one day.