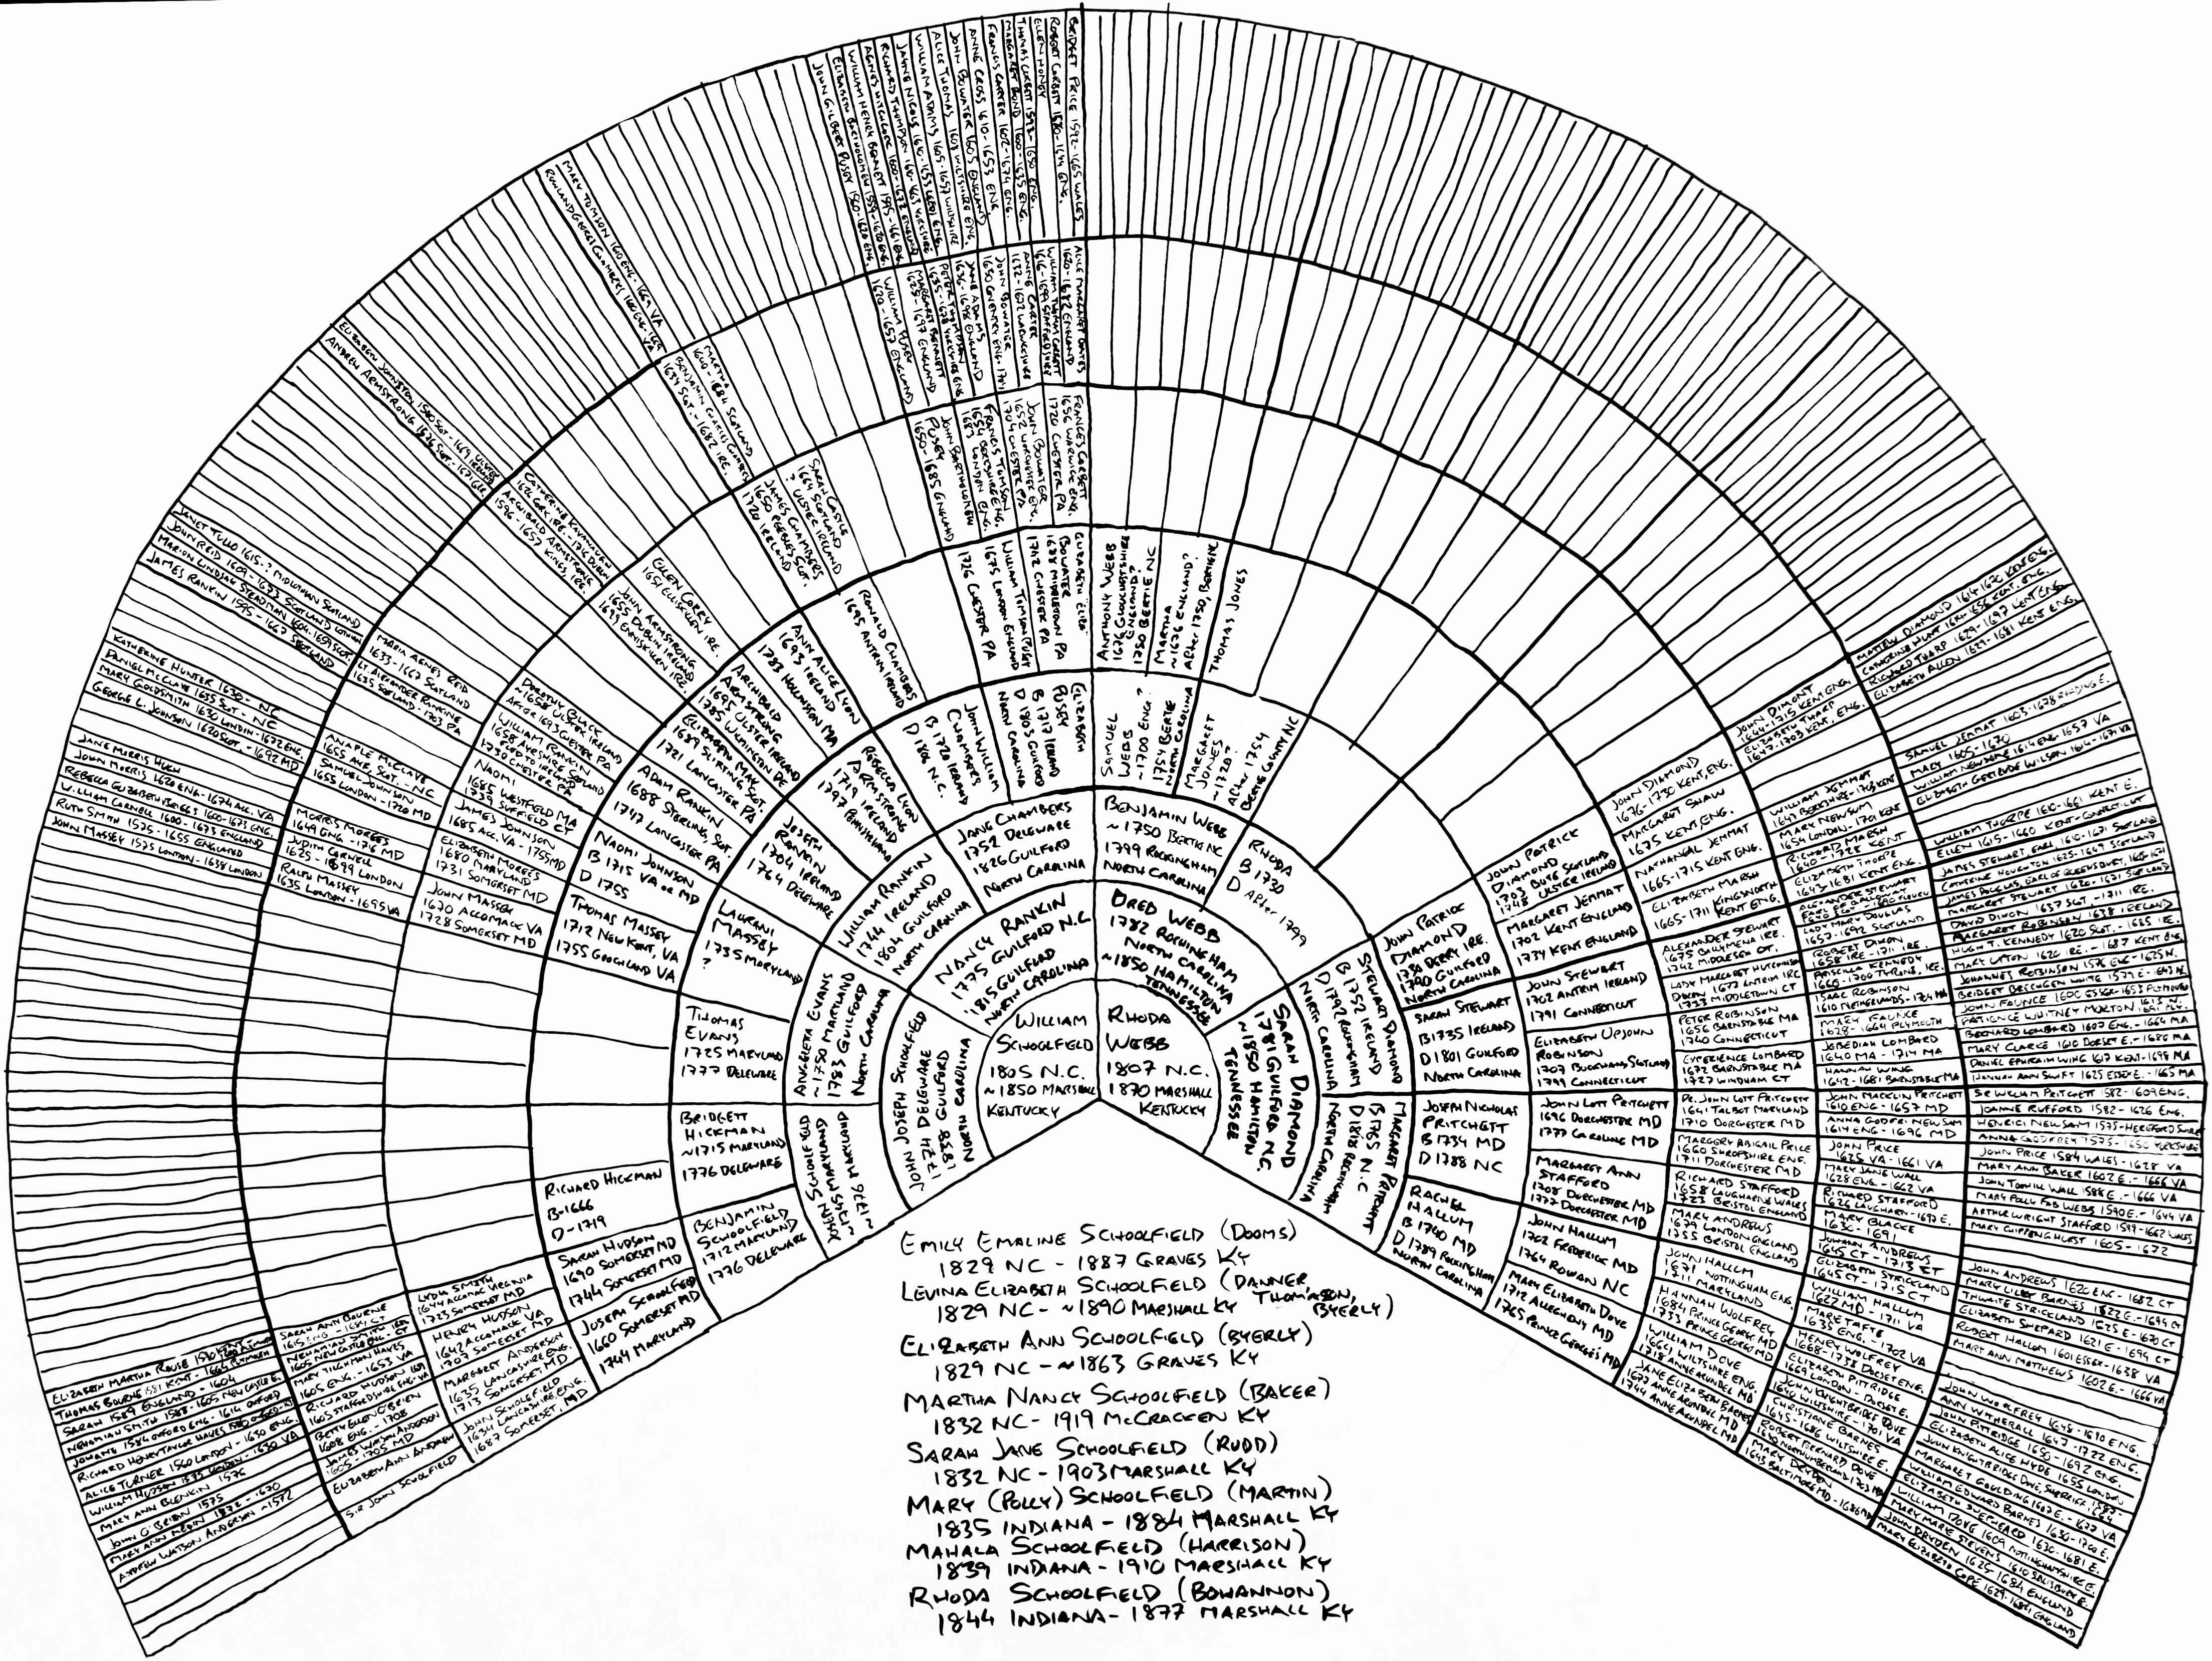
A genealogical fan chart (like the one above) starts with a set of children, then fans out through their parents, grandparents, great-grandparents, et cetera. The nth generation has 2n ancestors, because generation n+1 has a biological mother and father for every person in generation n. (It is hard to do the same thing with descendants because each descendant has a variable number of spouses and children.) If you go far enough (nine generations, like above), there is only room for one line per ancestor in the outer ring, and even then you need a fine-tipped pen.
There are plenty of blank fan charts you can purchase online. Most genealogical software also has an option for automatically generating them, for a price. Eh, why not just draw them by hand? Part of the experience should be learning who your ancestors are, and there is no learning technique that can rival copying down their names one by one by hand. It also looks more personal, more human, more valued, if it's done by hand. Bigger is better ... but wallspace is at a premium, so it's likely to get rolled up and stored. An online .jpg from a scan or photo will probably be the most used version of it.
Finding out your ancestors is easy now, though pricey again. A 1-year subscription to Ancestry.com is about $200, though they sometimes have free trials. The chart above took me under a week to research.
The chart itself has dimensions 3 high by 4 across (for some unit, for example 1 foot, so 3 feet by 4 feet). The one above had an 11.5 inch unit, and was drawn on an 18x24 inch sketch pad. I'd rather have stiffer whiter bigger paper than what I used here. The layout is initially done in pencil, then done over in india ink, then the pencil is erased. I used Faber-Castelle Pitt artist pens, india ink so it doesn't smudge or bleed. One of those pens has a very fine tip, which is important for the outer generations. You'll need white-out too.
The center is 2 units across and 2 units down. Start lightly with pencil. Start with a cross through the center (4 across, 2 up). Then add rays of length 2 every 30 degrees. Such rays will end 1 away from one of the cross lines, and be of length 2, that's enough to locate them. After that it's dividing angles by two: use a ruler to find the distance between the lines at some length out from the center, then read the ruler to see where the dividing line should be. The fan chart doesn't really require 30 degree divisions, but having them causes the cross, and causes the edge lines to continue through the center, which adds to the feeling of rightness of the diagram.
Once the main rays are in place (17 of them, dividing the gg-grandparents), decide where the circles will go between generations. The outermost generation will have only one line of text, the next will have two lines, before that you have lots of space, so make sure you have enough room for those outer generations. Mark those distances on each of the rays, then sketch the circles freehand.
Now go over the rays and circles with india ink. Note that the rays don't go all the way to the center, except for the edge ones and the vertical line. All the rest end at one circle or another. Be careful not to draw the lines too far, or you'll need white-out.
I originally included year-month-day, but that's very private information for living people, and for ancient people the month and day is just noise. So now I just use year and place. The year and place paint the story of who they were and where they went. For example, in that chart above, anyone born in England or the Netherlands, and died in Plymouth, is probably a pilgrim. Consider starting with a family where all the children are already dead (like, your grandparent is one of the children). This lets you post your chart online with no privace worries. For example, above, Levina is my ggg-grandma and Elizabeth is my gggg-grandma.
Write out the children lightly in pencil. Include year and location of birth, and year and location of death (or leave room for death if they're still alive). Doing it in pencil lets you make sure you've got it centered and have enough room and have your text straight and level. Once that looks good, do it again in india ink. Don't try to trace the pencil, just use where it is as a guide for where and how long the lines should be.
Do the first four or five generations of ancestors with a medium-width india ink pen. Don't bother with pencil first. But, be very aware of putting the woman on the left and the man on the right. The parents have their lines horizontal. The grandparents and great-grandparents have text following the circle, treating the center as down. Further generations treat their box as a rectangle and treat the lower broad side of the rectangle as down. Father's side treats left as down, mother's side treats right as down. Keep aware the woman is on top on the father's side while the man is on top on the mother's side. The outer three generations all use a very fine tipped india ink pen.
Try to straighten out all your uncertainty about who your ancestors are in Ancestry, before copying things down. If you change your mind as you go you'll need white-out to correct things. Possibly lots of white out. Obviously, the less white-out you use, the better you did.
The way I got the .jpg above was I took a photo, then processed it with Irfanview (free): fine rotate by 1-degree left, crop, color adjust increased contrast, color adjust brighten, convert to grayscale, save as .jpg.
Don't be worried about leaving big blank spaces. This type of chart is inspiring. Oddly, it's those blank spaces that are inspiring, not the parts that are filled in. The blank spaces hint at unknowns that you might learn about in the future and fill in later.