|
|
Combining Watercolor pencils
with Oil and Wax based pencils
by Barbara Krans Jenkins
|
Combining pencils for a finished work
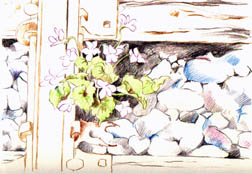
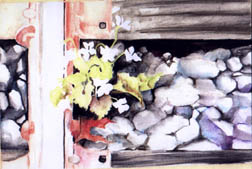
Step #1
WC Pencil Contour Line
I use different paper surfaces, all 100% rag, hot press, acid free. This piece is done on Lanaquarelle 300 lb. Hot Press Watercolor board made by Strathmore. Others I use vary from Crescent Hot Press 115 Strathmore Watercolor Board, to Rising Stonehenge Museum Board, to 3-Ply Strathmore Plate finish Bristol Board to 4 ply Strathmore Museum Board, to 300 lb. Fanriano Uno.
|
|
|
Most the time, my work begins with a pen and ink contour line drawing of my subject on the paper. This piece, I wanted to be 100% CP's, so, I used watercolor pencils for my initial contour drawing. After a few very light sweeping gesture lines in graphite, I begin my careful contour line drawing using a number of brands and colors of wc-cp's (watercolor colored pencils). I take great care NOT to draw over those graphite lines with colored pencils because if I do so, the graphite line becomes "sealed" and influences the local colors by retaining a dark line. You can erase graphite, but colored pencil does not erase well. Next, I gently erase the graphite strokes with a kneaded eraser as it will not disturb the surface of the paper. I use a piece of clear acetate, or tracing paper under my right hand (as I am right-handed) as I work. This protects the surface of the paper from any body oils (yes, we all have them!).
|
|
|
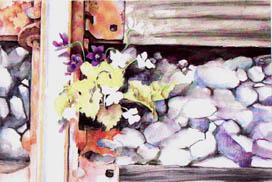
Step # 2
Under-painting of Watercolor Pencil Wash
|
After the color contour line is down with the wc-cp's, I lightly apply
pigment to a few other areas for a wash. Sometimes I scribble some
wc-cp's in dense spots on scrap watercolor board on the side. I then
can add water to those to make a pool of watercolor pigment to paint
directly with as I need them. In this painting,I did not do that,
however. I next used brushes (#6 Round and 1/2" flat watercolor
brush) and water to "pull" out the pigment across the paper, creating
a wash of simple local colors ("local colors" meaning: browns for the
wood, violet for the flowers, greens for the leaves, and I got carried
away with lots of colors in the stones). This was allowed to dry
thoroughly.
|
|
Step # 3
Begin detail application with Oil and Wax Based Colored Pencils
Layering and burnishing
I now begin applying color in light layers, building and mixing as I go. Finally burnishing small areas at a time to completion. By "burnishing", I mean applying pressure with a light color. As I work, pressing hard, in little circular motions, Im picking up the colors I have carefully laid down already and blending them together to make a new color. This, then is what I call "painting" with a dry medium. When I burnish, I generally use a light color, often white, but not always. As I burnish, I am creaming the pigments together, and pushing them, little by little, down into the "tooth" of the paper. The end result is a nice polished surface appearance.
There is no real problem mixing the wax and oil based pencils. One interesting thing, though, is that the different kinds of pencils have such a wide range of different properties. Some are dryer, others are creamy and smooth.
|
|
Oil based pencils never have the problem of "Wax Bloom" that wax based pencils do. The wax that is mixed in with the pigment will sometimes in time, depending on environmental factors, begin to separate and lift to the surface forming a very soft, subtle white cloud which "floats" over the surface. It is not always very apparent, in fact it may go unnoticed altogether. It may surface that day, or in a couple days, or even in a couple weeks. If the surface of the art is carefully rubbed when finished, this can get rid of potential wax bloom, but, jeopardizes the art by smearing colors over a light area, for instance. Another prevention technique is to spray the art slowly and carefully when it is complete, with Krylon Workable Fixative. Several layers should be applied after waiting for complete drying in-between layers.
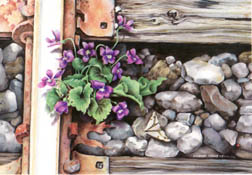
My challenge was first, to get the corroded iron joints to look convincingly real. I loved the abstract patterns on the aged surface and had great fun working on them. Then, I began working on the violets. Then the weathered textures of the Wooden tie demanded attention, as I worked on across and then down my composition, being mindful that my "focal Point" was to be the flowers, so, I needed to be sure they "popped" forward to the viewers eye. This is accomplished by the brightness of the blossoms and leaves as they jump to the forefront, while the areas around them fall into darkened shadow.
I work slowly down my image, taking time to study it as I go.
|
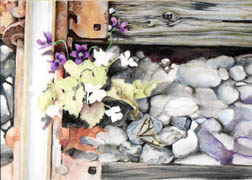
Step # 4
Addition of Moth
|
When I am working on location, I most often put whatever insects and critters happen onto my subject field, into the art. This one, I was working out of the studio, so, I was thinking about what insects I wanted to put in the work. I happened upon a dead moth, perfectly preserved, lying on the ground. So, I decided to "give him" a little imortality, so to speak
help him live on
and painted him into the artwork!
|
|
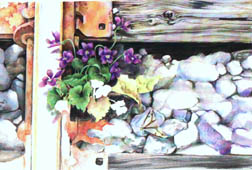
Step # 5
Adjust composition, and move to completion
|
|
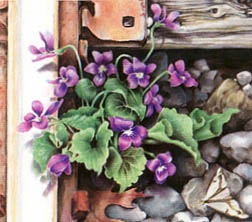
I decided to soften the dark area by the violets and added another subtle blossom in the shadows as I worked on down through the violets and their leaves. I added shadows on the silver rail from the delicate blossoms.
A ladybug also flew by and insisted on being added to the art. So, I put her down in the right corner, where my signature would go. They are such very helpful insects and so beautiful as well.
Next, using a stylus, I embossed my signature down in the right corner of the painting, right over the rocks that I was about to finish. This way, embossed into the under-painting, it would show up, yet not command any attention away from the subject. As I continued to add pigment and burnish, the embossed signature remained intact. I feel so strongly that an artists signature should never interfere with the art work!
|
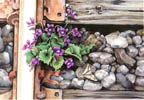
Step # 6
Complete art
|
This was the first time I ever did stones, so, I saved them for last, of course. I really found I enjoyed doing them very much.
The title "Fleeting Moment of Glory" alludes to the fact that these beautiful and delicate blossoms are laying over the rail of the track. Their blossom may be short lived, but, it certainly does not have to go unnoticed. In my wildlife, I am forever trying to get people to slow down and look carefully at what they too often just take for granted. No matter how common violets are as I walk in the woods, I never tire of coming upon another. For me, there is a sense of privilege.
God is so good to us!
|
Click on picture for larger view
|
|
Close-up detail in
"Fleeting Moment of Glory"
|
About the Artist
"Next to figure drawing, I loved oil painting best in college. While raising a family, I worked with graphite and pen and ink for about ten years until I discovered colored pencils in the late 70s. They were perfect! Clean and portable! Knowing no one else who worked in this medium, nor finding any books on the subject, I found my own way, developing a layering and burnishing technique that looked much like the oil painting I loved, but without all the mess and smell.
I enjoy working on location, whether it is doing a delicate botanical study or a more elaborate painting, selecting forest floor microcosms from the abundant flora and fauna around. Its always important to me to capture the delicate ecological balance of my subjects in their environment. My subject matter is from the Cuyahoga Valley National Park nearby, to the Mendocino headlands of Northern California. I still work in oil, pastels and watercolor on occasion, but prefer the control and convenience of colored pencil (watercolor-based, oil-based and/or wax based) pigments, often over fine ink contour lines (because to this day, I still love line!) on a hot press (but lightly toothed), archival, heavy watercolor or Bristol paper or board. Two favorites are Fabriano Uno 300 lb. Hot Press, and Strathmore 500 lb. As I apply pigments, some say my subjects appear to spring to life, right off the surface of the paper!
I find my art process to be renewing, and healing. As I work, pondering in awe the marvelous works of the Master Creator, I am transported to a quiet place with God. Time vanishes. I hope my work imparts my love, passion, and reverent appreciation of our land and its Maker."
The Artist invites you to visit her website at:
https://burtleburtle.net/moma
|
This page copied (with permission)
from gallery.passion4art.com
|
|